4 ways to turn a tree stump into a garden feature

Stump grinding costs $300 to $500 for an average stump in Northern California. Large stumps over 24 inches across run $500 to $800. And the grinder tears up a 4-foot radius of your yard in the process. Before you write that check, consider the alternative: turn the stump into something your neighbors actually stop to look at.
Tree stumps decompose over 3 to 7 years depending on the species. Softwoods like pine and redwood break down faster. Hardwoods like oak and maple hang around for a decade or more. During that time, the decaying wood feeds beneficial fungi, bacteria, and insects that enrich the surrounding soil. That makes a stump a surprisingly useful garden feature, not just an eyesore you need to hide.
Here are four ways to put yours to work, plus the science behind why stumps are worth keeping.
How does a tree stump decompose?
Before you start any project, you need to understand what’s happening inside that stump. Decomposition starts the moment the tree gets cut. Saprophytic fungi, mostly white-rot and brown-rot species, colonize the wood and break down the lignin and cellulose. You’ll see this as mushrooms, shelf fungi, or soft spongy patches.
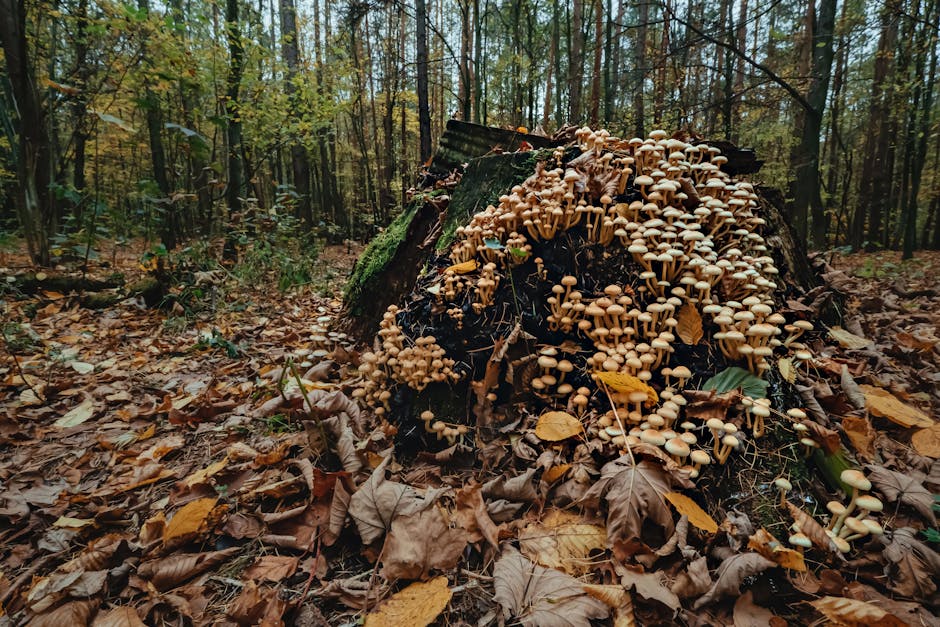
Brown-rot fungi leave behind a brownish, crumbly residue that’s mostly lignin. White-rot fungi break down everything, leaving pale, stringy wood. Both types are harmless to living trees nearby. The ISA (International Society of Arboriculture) confirms that decay fungi on stumps are saprophytic, meaning they feed on dead wood only.
One thing to watch for: as wood decomposes, the fungi temporarily tie up nitrogen from the surrounding soil. This is called nitrogen immobilization. Plants within 2 to 3 feet of a decaying stump can yellow from nitrogen deficiency. The fix is simple. Sprinkle a handful of blood meal (12-0-0) or ammonium sulfate around the base each spring. Problem solved.
1. Build a fairy garden or gnome home
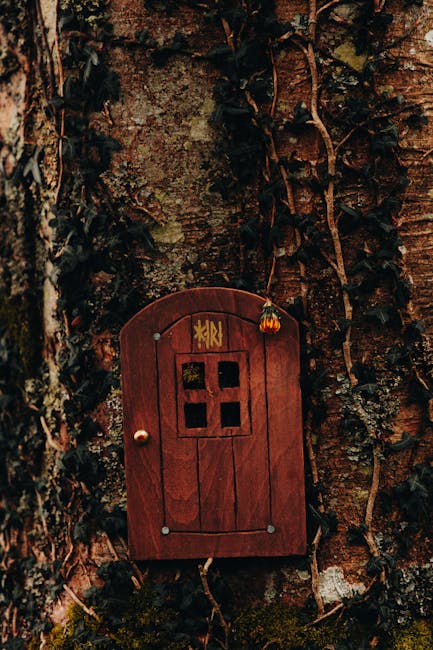
Kids love these. Adults pretend they don’t, but they do. I built one on a Valley Oak (Quercus lobata) stump in my side yard three years ago. My daughter was seven. She’s ten now and still checks on the “fairy village” every week.
Hollow out a small section of the stump face using a wood chisel and mallet. You don’t need power tools. Aim for a cavity about 4 inches wide and 6 inches tall. Add a miniature door and windows from a craft store ($3 to $8 for a set), and string some battery-powered fairy lights around it. Use small pebbles or stepping stones to build a path leading up to the entrance.
The stump’s natural texture and moss growth make it look like something out of a storybook without much effort. Encourage moss by misting the shady side with buttermilk diluted 50/50 with water. Moss spores from your yard will colonize within a few weeks during the rainy season (November through March in NorCal).
Spend more on this if you want. Miniature fences, benches, bird baths, and ladders are all available on Etsy for $5 to $15 each. Or let your kids build accessories from sticks, acorn caps, and bark scraps. The best fairy gardens look found, not bought.
Best stumps for fairy gardens
Short, wide stumps (12 to 24 inches tall, 12+ inches across) work best. The stump should still be firm on the outside, even if the interior is getting soft. Softwoods like pine and fir are easier to carve. Hardwoods like oak take more effort but last longer.
2. Convert it to a stump planter
This is the easiest project on the list and it looks great year-round.
Hollow out the center of the stump with a mattock, an ax, or a drill with a 1-inch spade bit. Start by drilling a grid of holes 8 to 12 inches deep, spaced 1 inch apart. Then chisel out the material between the holes. This takes 30 to 60 minutes depending on the wood hardness.
Fill the bottom two inches with gravel for drainage, then add a 50/50 mix of potting soil and compost on top. Plant whatever suits your light conditions:
- Full sun stumps: petunias, marigolds, portulaca, or sedums
- Part shade stumps: impatiens, coleus, begonias, or ferns
- Herb stumps: thyme, oregano, rosemary, and trailing nasturtiums (these cascade down the sides)
- Succulent stumps: hens-and-chicks (Sempervivum), echeveria, and string of pearls work well in zones 9-10
The bonus: as the stump breaks down over the next few years, it releases nutrients directly into the soil your plants are growing in. The wood retains moisture too, so stump planters need less watering than a standard pot. I water mine every 3 to 4 days in July, compared to every day for my terracotta pots.
Drainage is the key
Drill two or three drainage holes in the side of the stump near the bottom using a 3/8-inch drill bit. Angle them slightly downward so water flows out. Standing water will rot the wood faster than you want, drown your plant roots, and breed mosquitoes. In California, standing water in your yard can actually get you a visit from the local mosquito abatement district. Skip that headache.
When to plant
Start your stump planter in early spring (March or April in zones 8-10) after the last frost. Annuals give you color fast. Perennial succulents give you a planter that looks good with almost zero maintenance. I switch between trailing petunias in summer and pansies in the cooler months (October through March).
3. Carve it into a seat or side table
If your stump is in a shaded, quiet corner of the yard, this is the move. A stump seat costs you nothing but an afternoon of work. Compare that to a $200 outdoor Adirondack chair that weathers and wobbles within two seasons.
Cut the stump to seat height (about 18 inches for a seat, 22 to 24 inches for a side table) with a chainsaw. Shape the top into a flat, level surface. Use a belt sander or 60-grit sandpaper to smooth the seat so you don’t catch splinters.
Some people get ambitious and carve armrests or a backrest. A chainsaw artist can do this for $100 to $300. Even a simple flat-topped stump with a weather-resistant cushion on top makes a solid reading spot. I have one next to my Japanese Maple, and I use it every evening from April through October.
Preserving your stump seat
Untreated, the wood will soften and decay within 3 to 5 years. To slow that down:
- Sand the top and sides smooth with 80-grit, then 120-grit sandpaper
- Apply two coats of exterior-grade penetrating wood sealer (Thompson’s WaterSeal or similar, $25 for a quart)
- Let it cure for 48 hours before sitting on it
- Reapply the sealer every spring, ideally in late March before the rain stops
The sealer slows moisture absorption, which slows fungal colonization. You’ll get 7 to 10 years out of a sealed hardwood stump. Softwoods like pine or fir, maybe 4 to 5 years even with sealer.
Structural check first
Test the stump before you trust it with your weight. Push a flathead screwdriver into the wood at several points around the sides. If it sinks more than half an inch, the interior is too decayed for structural use. Stick with a planter instead.
4. Turn it into a wildlife habitat

The original article here said “treehouse base.” I’ve changed my mind on that one. Most residential stumps aren’t big enough or structurally sound enough for a playhouse. What they are good for is wildlife habitat. This is the zero-effort option and it has real ecological value.
A decaying stump supports dozens of species. Carpenter bees (non-aggressive, solitary bees that pollinate your garden) bore into the soft wood. Ground beetles, centipedes, and salamanders shelter underneath. Woodpeckers and flickers hammer the stump looking for beetle larvae. Toads tuck into the gaps at the base.
Leave the stump alone, or make it even better:
- Stack logs and branches around the base to create a “habitat pile” for ground-nesting bees and beetles
- Drill 6-inch deep holes (3/16 to 5/16 inch diameter) at slight upward angles in the sides. Native solitary bees will nest in these. Keep the holes facing south or southeast for morning sun
- Leave the bark on. Bark crevices shelter overwintering insects that your garden needs in spring
- Plant native groundcovers around the base: wild strawberry (Fragaria vesca), creeping thyme, or California fuchsia (Epilobium canum) in zones 8-10
The UC Davis Arboretum and Public Garden recommends retaining deadwood in residential landscapes specifically because it supports pollinator populations. Their sustainable gardening research shows that properties with standing deadwood had 40% more native bee species than manicured yards without it. The Arboretum’s own gardens leave stumps and fallen logs in place as demonstration habitat, proving this approach works even on a university campus.
Won’t the stump attract termites?
This is the number one question I get from neighbors. Short answer: it depends on the species and your situation. Subterranean termites (the common type in California) feed on dead wood, and a stump 20 feet or more from your house is very low risk. Termites have to maintain contact with soil moisture, so they’re not going to travel from a stump across 20 feet of open ground to reach your foundation.
If the stump is within 10 feet of your house, either seal the cut surface with wood preservative or go ahead and grind it. Don’t take chances with your home’s structure for the sake of a garden project.
What about stump removal chemicals?
Some people drill holes in a stump and fill them with potassium nitrate (stump remover, $10 to $15 at any hardware store) to accelerate decomposition. This works, but it takes 4 to 6 weeks, and you can’t plant in a stump while it’s being chemically broken down. The potassium nitrate oxidizes the wood, making it spongy enough to break apart with an ax.
If you’re planning any of the projects above, skip the chemicals. You want the stump intact for as long as possible. If you just want it gone, the chemicals are cheaper than grinding but require patience. Pour the granules into 1-inch holes drilled 8 inches deep, add water, and wait.
The bottom line
Stump removal is expensive and tears up your yard. Stump keeping is free and gives you a planter, a seat, a fairy garden, or a pollinator habitat. A $20 fairy garden kit beats a $400 grinding bill every time.
The best time to start any of these projects is right after tree removal, while the wood is still firm and easy to work with. By year three or four, most softwood stumps are too spongy for carving or seating, but they’re perfect for planters and wildlife habitat.
For more yard project ideas, check out our guide to landscaping around your trees for ways to make every tree in your yard look intentional. If you do decide to remove a tree entirely, understand the full cost and legal requirements first. And if you’re planting a replacement, see the best trees for your yard so you don’t end up with another problem stump in 20 years.
For inspiration on blending natural elements into your outdoor space, these ideas for decorative garden accents pair well with stump projects. And if you’re also dealing with branches and logs from the removal, here are some practical yard project tips to put all that material to use.